
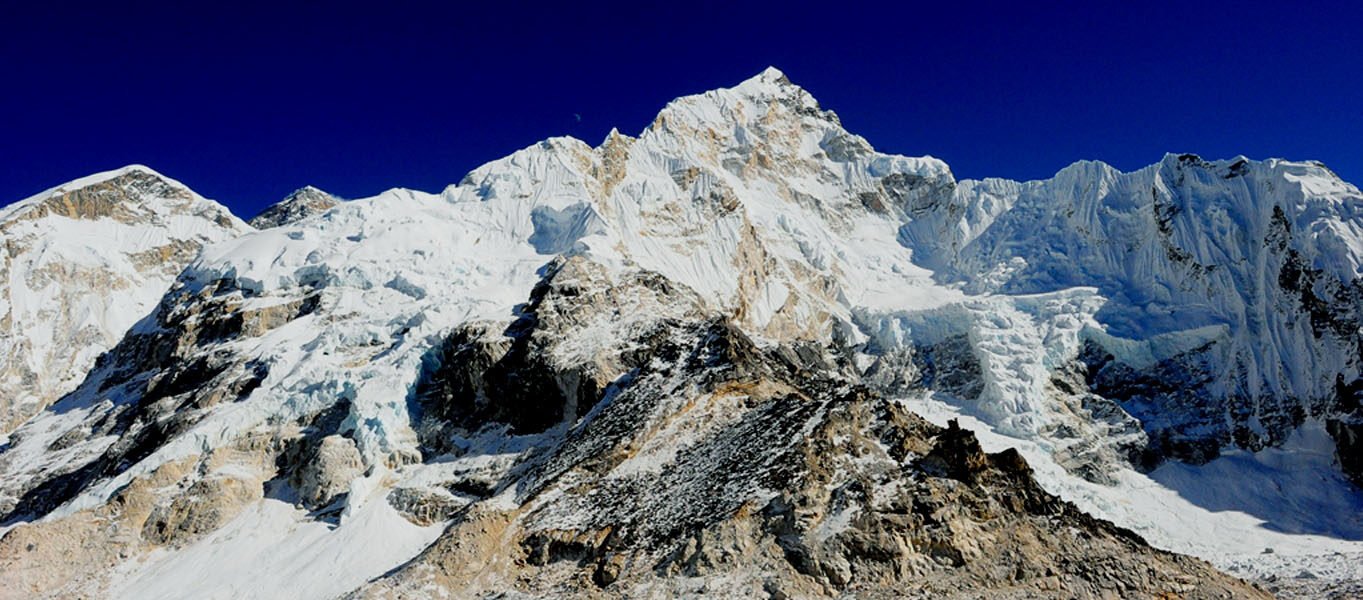
Everest Base Camp Trek is truly a unique experience, and being able to take some amazing photos alongside treks on Mount Everest Base Camp will help you to record some priceless memories. The route provides some of the most stunning landscapes in the world — majestic snow-capped peaks, deep gorges, colorful prayer flags, and quaint mountain villages. But shooting in the Himalayas offers some unique challenges and opportunities that every traveler should know about beforehand. Knowing how to harness light, landscape, and weather is crucial to taking unforgettable shots.
Preparation is key to capturing your Everest Base Camp hike in stunning photos. 1. Bring a camera you are comfortable using. This could be a DSLR, a mirrorless camera, or even a really good smartphone. Conditions in the mountains are fickle, so keep your gear protected. Bring extra batteries and memory cards, as the cold can kill battery life in a hurry. A small tripod to take long exposure photos when the mountains are glowing in the first and last light times. Try out your manual settings if you can, as it allows you to adjust light and composition better, especially a snowy and low-light conditions.
Your timing and location also factor into trail photography massively. Natural light is best in the early morning and late afternoon, with softer shadows and more saturated colors. Namche Bazaar, Tengboche Monastery, and Kala Patthar are some of the must-see places for the most iconic views of Everest and other neighboring peaks. Pause at each stop and frame the shot with care. Include local life, such as yaks laden with supplies, prayer wheels whirling in the wind, and village children at play in the alleyways, to humanize your storytelling. Don’t just concentrate on the mountains; the culture, textures, and moments in between are equally important.
Ensuring your gear is at the ready is also important. The weather can flip in a minute, and so can the light. A moment of clear sky or a rainbow over the ridge can disappear in seconds. Have your camera out so you’re always in shooting position. Use the lens cloth often to ensure that snow, dust, or moisture does not gather on your lens. Clean the lens on your phone and use manual apps that allow you to change exposure and focus, if you’re using a phone. Shoot always in the highest resolution available so that you can have flexibility with editing later.
Equally important, however, is knowing your physical limits. The altitude and physical effort can be draining, and stopping every few minutes to take photos can interfere with your acclimatization. Prioritize your health first — hydrate, rest, acclimate — so you’re in the best shape to enjoy and photograph the scenery. Sharing the trail with others also means being respectful; don’t stand in the way, or enter sacred areas in search of a better framing.
In the end, the best Everest Base Camp photos are a combination of these and more – when preparation meets patience and marries the present moment, there’s nothing you cannot achieve. Recreate not only the vistas, but the sensation of being in the Himalayas — the cold, the silence between peaks, the friendships made along the trail. These are the real memories that photos should capture.
What Camera Gear to Carry to Everest Base Camp?
Picking the best camera equipment for the Everest base camp trek is key to a successful photography adventure. You’ll be on your feet for long hours at high altitudes, so weight matters — only pack what you’re willing to carry for 10 to 14 days on your back. Enjoy professional photography with a mirrorless camera or a compact DSLR and leave the excess baggage at home. As a smartphone user, you should have a smartphone with a high-resolution sensor and options for manual control. Wide-angle lenses work well to photograph the large landscapes and mountainous regions, and a 50mm or telephoto lens is used to complete portraits and close-ups of the distant mountains, such as Ama Dablam or Everest. Come with plenty of batteries — cold weather will eat up battery life — and three or four spare memory cards in case of failure or running out of space. Keep your gear safe in waterproof or padded cases. A good thing to buy is a compact tripod for low-light or time-lapse shots. A cleaning cloth for the scope is a good idea, too; dust, snow , and condensation can mar your views. Have your camera handy while trekking to capture serendipitous sights, such as prayer flags caught in the breeze, yaks crossing bridges, and the play of light on the surrounding peaks. Your gear selection should be weighted towards a balance of quality, weight, and ease of use. With some smart packing and a few key tools, you can make gorgeous photo stories of your journey without sacrificing comfort and safety.
Tips on how To Deal with Extreme Weather While Shooting?
The weather conditions in the Everest region change quickly, sometimes within minutes. From intense UV at higher elevations to random snow or rain, nature photographers should be ready for just about anything. Cold air can fog lenses, freeze gear, and deplete battery power rapidly. To prevent this, keep batteries in an inside pocket as close to your body as possible so they stay warm. When your camera is not in use, store it in a weatherproof bag or a dry sack. Take your camera rain cover or wrap it in plastic for surprise showers. When transitioning from cold outdoor air to a warmer lodge, condensation is an issue, so allow the camera to acclimate within its bag before being opened. UV filters benefit you by protecting your lens from not only scratches, but harsh sun, which will cause blinding sun glare, particularly off reflective snow and ice. And gloves with fingertips that work with a touchscreen save you from having to take them off to fiddle with your camera settings. Let’s take a look at how even cloudy skies, snowfall, or storms can help add mood and contrast to your images. Don’t avoid “bad weather” — learn how to work with it. Outside of that, just expose for the extremes now and take a quick click in RAW to add some local contrast. Not only does weather awareness provide safer shelter for your gear, but you are also sure to take more interesting and atmospheric shots of the trail.
What is the Best Time to Take Pictures at the EBC Trek?
Past a certain point, timing is everything in mountain photography, and photographing your shots at the right time can be the difference between killer shots and mere vacation snaps. The optimal time to capture pictures on the way to Everest Base Camp is during the ‘golden hours’—just after sunrise and right before sunset. Such times provide soft, warm light that accentuates the texture of mountain walls, snow-capped peaks, and prayer flags. First light of the day is particularly magical when it first strikes Everest and the surrounding peaks like Lhotse and Nuptse. Shadows are softer, and the atmosphere is often clearer with fewer clouds. Midday sun, meanwhile, tends to be too harsh, flattening the scene and washing out highlights, especially when there is snow. But you can still shoot during this time if you make some adjustments to your camera settings — utilize the lowest ISO, open up your shutter speed, and if needed, add a polarizing filter so you can control the reflections. Make sure you are trekking on those days in a way that gets you to Kala Patthar or Tengboche at golden hours. Be patient and ready to wait for the light to change. The best light can elevate a good composition to a great one, so approach your photo strategy around the sun, rather than just around your location.
How To Capture a Gorgeous Landscape In the Himalayas?
Everest Base Camp Tour It takes being in the Himalayas you truly encapsulate its majestic and enormous landscape. Start by learning about composition. Use the rule of thirds when composing to place horizon and key elements such as the peak, ridgeline, or prayer flags in the strategic lines of your frame. It’s all about interest in the foreground—rocks, trail, or hiker gives depth and scale to your photos. Use a leading line, such as a trail or stream, to guide the viewer through the image. Shooting with a wide-angle lens works well to preserve those sweeping views, especially from high points like Kala Patthar. Use an aperture of f/8–f/11 for maximum depth of field so that everything from foreground to background is sharp. Be mindful of exposure — snow and ice reflect a lot of light, which can trick your camera’s metering system. Underexpose your images slightly to prevent blown-out highlights and shoot in RAW so you can recover any missing detail in post-processing. Shoot the scene from all angles, and don’t be in a hurry, hang it out for the right light and mood. Clouds drifting past peaks or the sun breaking through mist can turn a pedestrian shot into something spectacular. The trick is patience, ingenuity, and being there in the moment.
How Do You Photograph the Local Culture and People With Sensitivity?
Photography on the Everest Base Camp trail isn’t just about mountains, however; it’s also about the colorful Sherpa culture and the daily rhythms of life in the Himalayas. Portraits, rituals , and village scenes add a human dimension to your travel story, though each one must be approached with respect and sensitivity. Always ask before taking a photo of someone, especially monks, elderly people, or kids. A small smile and a gesture with the hand can make a big difference. If someone tells you no, respect their refusal. Refrain from disrupting ceremonies or prayers, especially in monasteries such as Tengboche. Some religious establishments will forbid photography entirely — it is always best to check the signs or with your guide. Let there be light, and that light should be natural, not the invasive flash kind. Capture real moments when shooting candid images, such as local women weaving, serving tea, or herding yaks. Mani stones, prayer wheels, colorful clothing – these types of cultural items give life and context to your images. If you return, consider printing photos and returning them to people; it offers good karma. Responsible travel photography means showing a story that respects the subjects, not taking advantage of them. And by treating people with respect and interest, your photos will be the richer for it, both artistically and humanly.
Tips to Capture Beautiful Sunrise and Sunset Pictures: What Skills Could You Master To Take Good Pics of Sunrises and Sunsets?
Everest Base Camp Hike The image, as the sun rises and sets over the Everest region, creates the most magical light, turning the mountains into huge golden giants. To bring back those moments, you need the right preparation and technique. Get to your selected location early to prepare your camera and tripod before the sun rises. Narrow your aperture (from about f/11 to f/16 or so) to get a deep depth of field and focus in sharp from the front rocks to the distant peaks. Manually adjust your exposure because the bright sky and dark mountains can fool your camera’s meter. Shoot processed images and bracket your exposures, capturing multiple shots at different exposures, then merging them later in an HDR photo with shadow and highlight detail. Include a silhouette in the foreground, such as prayer flags, rocks, or trekkers, to add depth and context. Employ a remote shutter or timer to reduce camera shake on long exposures. Monitor the weather forecast to find the perfect time to shoot—clear skies will produce beautiful colors, while a little bit of cloud adds some drama and texture. Note the evolving light over a few minutes that starts as soft pinks and ends as fiery oranges and reds. Oh, and remember to take a few moments here and there to soak up the epic-ness of it all – sunrises and sunsets are some of the highlights on the trail, and they make for great photo ops!
When And How To Use Composition To Tell A Story In Your Photos?
Beautiful photos are one thing, but great photos tell a story. Base Camp photo trekking is a story in composition. Begin with the rule of thirds and position the most interesting elements in the composition along the imaginary lines in the grid for balanced and dynamic photos. Let leading lines, like trails, rivers, or fences, lead the viewer’s eye to the main subject. Get creative with your framing by incorporating natural elements like tree branches, doorways, or prayer flags. Add scale, and include either animals or people in such large spaces to help get the feeling that the size of the Himalayas. Look for patterns and textures — stone walls, woven baskets, yak fur — to add depth. Document natural interactions between locals, trekkers, monks, etc., to show emotion and culture. Contrast with color, a la bright clothing against the earth-toned mountain, to make the eye go. Change your point of view — shoot from down low to feature dramatic skies or up high to display sweeping panoramas. The idea is to bring viewers into the journey with you, letting them smell the air, feel the culture, and experience the spirit of Everest, not just see it. Thoughtful composition can transform snapshots into compelling narratives.
How Can You See or Photograph Wildlife on the Everest Base Camp Trek?
Everest Base Camp Trek Itinerary Although the region of Everest is generally famous for its beautiful terrain, it is also home to distinctive Himalayan wildlife, rewarding you with an added thrill to your photo collection. The mysterious snow leopard, Himalayan tahr, blue sheep (bharal), and several species of birds, including the Himalayan monal pheasant and lammergeier vulture, are the animals that can be found in these mountains. Photographing wildlife requires patience and respect. Get long shots of animals from a distance without spooking them with a telephoto lens (200mm or greater). The best time to spot wildlife and to benefit from the best light is in the early morning and late afternoon. Keep quiet and don’t make any sudden moves or loud noises. Tracks, droppings, or pushing vegetation may be clues to the whereabouts of an animal. The use of binoculars can help identify subjects for photographing in advance. Shoot animals in their natural state – grazing or drinking water, or doing something related to the environment. Failing wildlife, photograph small life forms, such as bright butterflies or insects, or the diverse bird life in and around villages. Good wildlife photography is ethical and shows respect for the animals and the environment, and the animals are never chased or fed. If you are patient and observant, your hike can provide you with stunning wildlife images, along with some great landscape shots.
Which Apps and Tools Are Best for Editing Everest Photos?
Post-processing your Everest Base Camp photos can do wonders for their impact and resolve a range of problems, such as high contrast or cold haze. There are plenty of popular apps (eg, Adobe Lightroom, Photoshop) with powerful color correction, exposure adjustment, and sharpening tools. To share photos daily, Lightroom’s mobile version is great for on-the-go editing. Use curves & levels adjustments to tease apart information in the lower end and highlights, which are especially important in snowy compositions. Correcting the white balance is critical to eliminate the bluish cast that is common in the mountains. There are simple to use on-the-go apps such as Snappseed where you can do selective edits, spot healing, and detail enhancements as well. For artistic effects, you may consider adjusting these filters slightly to keep natural-looking mountain colors. If you’re shooting RAW, you will have full room to play with during editing. Batch processing allows you to add similar edits to multiple photos in short order. Cloud storage programs like Google Photos or Dropbox can help you back up your photos on a consistent basis so you don’t lose any precious memories. The point of editing isn’t just to fix flaws but to elevate the story your pictures tell, to get to the emotion, the grandeur of your adventure on Everest.
How to Share Your Everest Base Camp Photos to motivate people?
When you share your Everest Base Camp photos, you can inspire others and keep your memories alive. Begin by picking out your best images that string together a narrative — camels and portraits and culture and landscapes. Write enticing captions to describe the narrative, your thoughts, or give tips to other trekkers. Social media platforms such as Instagram, Facebook, and Pinterest are good for reaching broad audiences (especially with hashtags like #EverestBaseCamp, #HimalayaPhotography, or #TravelPhotography). Photographers have community feedback and exposure on sites like 500px and Flickr. Perhaps you might want to create a blog or a YouTube channel where you can tell intricate stories with your pictures. You might want to consider creating photo books or printing out albums for gifts to family and friends who would appreciate a keepsake of your wedding day. When distributed, be sure to respect the privacy and general dignity of the folks you photographed by not including or identifying particularly sensitive content or locations. Interacting with your followers by answering queries or revealing behind-the-scenes tips creates a connection. And remember, your photos aren’t just showing off mountains — they’re sharing your own Everest experience and inspiring others to discover and appreciate this incredible part of the world.
How Long Do People Spend at Everest Base Camp?
The duration that trekkers stay at the Everest Base Camp Trek Package varies; however, most visitors only stay a few hours to explore and absorb the atmosphere. Most programs have a rest day at EBC for acclimatisation and savouring the awesome ambience of the world’s highest base camp. It is where trekkers traditionally stop for photos, to pay their respects at the famous Everest memorials, and to chat with fellow adventurers and Sherpas. It’s unusual for anyone to stay at EBC any longer than that, as it is essentially a staging camp for climbers making an attempt to go up Everest, not a permanent settlement. After reaching EBC, the majority of trekkers come down the trail to the safety of lower elevations. The entire EBC round trip typically takes 12-14 days, as part of a gradual ascent to reduce the risk of altitude sickness. But a few trekkers spend more time in nearby villages like Gorak Shep or Namche Bazaar to acclimatise or explore. The weather and one’s level of fitness could be factors in total time on the trail. Develop a flexible itinerary with rest days at EBC or nearby for conditions and health. At the end of the day, your stay at Everest Base Camp is about finding that middle ground between adventure and safety, and enjoying the breathtaking Himalayan vista that you’ll never forget.
Do I Need a Permit to Trek to Everest Base Camp?
Yes, you do need permits to hike to Everest Base Camp in Nepal. The two main permits needed are the Sagarmatha National Park Permit and the TIMS (Trekkers’ Information Management System) Card. The Sagarmatha National Park Permit, which is approved by the Nepalese government, acts as a permit to this protected region around Everest and also funds conservation efforts. The TIMS card is a registration card for the safety and security of the trekkers in the region. You will need to buy both permits before you enter the park, generally in Kathmandu or directly from an entry point such as Monjo. It’s important to keep these permits with you, as park officials and local police regularly check trekkers on the trail. Prices fluctuate with the season and nationality, but as an approximation, permit fees should add no more than $50USD 60D to your total trek budget. When you hire a registered guide or trekking agency in Nepal, the permit process is typically handled for you. Permits are not just about ensuring legal entry, but also about responsible tourism and protecting the delicate ecology of the Himalayas. You’ll be fined or blocked from entry without these permits — trekking in the Everest region is done illegally at your risk.
How Much Should You Budget for an Everest Base Camp Trek?
The cost of the EBC Trekking varies with a number of variables such as the route, duration, guide and porter, and own spending. The cost of a normal 12-14-day trek ranges from $USD1,200 to USD3,000 per person. The major costs are the flights to and from Kathmandu, permits (Sagarmatha National Park Permit and TIMS card), guide and porter costs, and accommodation and meals on the trail. The lodges and teahouses of the area provide basic but comfortable rooms, with prices rising as you ascend. A guide, who for safety and cultural understanding is highly recommended, typically charges $25–$35 per day. About $20–$30 per day for porter services to help with the physical workload. Additional expenses could include travel insurance with high-altitude coverage, gear purchases or rentals, and personal purchases like snacks or Wi-Fi fees. You can also cut down on cost by choosing budget travel, group tours, or self-guided hikes. At the high end, luxury tours with private rooms and helicopter transfers bump up costs considerably. With a little bit of budgeting and planning, you will be able to get the most out of your Everest Base Camp adventure without breaking the bank.
How Difficult Is the Everest Base Camp Trek?
The Mount Everest Base Camp Tour is relatively strenuous but entirely possible for any moderately fit and prepared hiker. The only challenge is the altitude; you don’t want to rush up without acclimatizing, or you’ll get sick from altitude sickness. The days are long, and hikers spend on average 5-8 hours a day on the trail, walking through terrain such as steep inclines, rocky paths, and suspension bridges. It can go from sun at lower elevations to bitter cold and the winds of Base Camp, which can be freezing. You will need good clothing choices and equipment. It requires working the body, the mind, and time: only then will the journey finally culminate. No, because it is a trekking route, not a climb, but you do need to be comfortable hiking on a rough path with a backpack. “Most trekkers will train beforehand with cardio, hiking, and strength work,” including yoga, added Dodson. Proper hydration, nutrition, and listening to your body are essential in managing altitude and fatigue. The trip is made a little more manageable by guided treks and experienced porters. The journey up may be tough, but you’ll be rewarded with some of the most incredible scenery on the planet, all while being immersed in the Sherpas’ way of life and a huge sense of achievement with the world’s highest peak.